This was my shower gift to Holly. For cute, right?
Wanna make one? Ready....OK!
First, you need the main apron fabric, about 29 inches (wide) by 30 inches (long). (This isn't exact, see explanation below)
And a coordinating fabric, 1 yd. (36 inches by 45 inches)
For the main fabric, you can give or take a few inches. Aprons don't have to go all the way down to the knee like Holly's does, and 29 inches for a waist is plenty of coverage, you could get away with trimming up to 4 inches off the waist measurement. (29 inches fit around my 7 month pregnant belly...so it should be good even if you're not skinny).
The main apron fabric is upside down in the picture below. From your main apron rectangle, cut out a curve for the chest area. I mark 7 inches from the corner along the width of the dress, make a mark, and then measure 10 inches down the length of the dress, and make a mark. From those two marks, cut a curve. If you already have an apron in your house, now is a good time to lay it against your fancy one and just use that as a guide.
From the yard of coordinating red fabric, you're going to cut a bunch of strips.
Your coordinating fabric strips will be:
- Ties: 2 strips of 5 inches by 45 inches
- Neck band: 4 inches by 45 inches. From this strip, trim off about 12 inches. These will be your pockets, if you choose to add them. If you don't, put em in the scrap bin.
- Ruffle: 3 strips of 6 inches by 45 inches
- Edging: 3 inches by 45 inches
Ok, all your pieces are cut out.
Let's start sewing.
For the ties and neckband, fold each piece half along the length of the strip, right sides together. Sew along this strip, and one side of the width. Then turn right side out. Iron.
For the pockets, cut the piece in half, so you have two 6 inch by 4 inch pieces. Fold over the outer edge of the whole pocket. Pin, sew in place.
Before you turn the neckband and ties right side out, they'll look like this.
And the edges will look like this.
At this point, if you want your apron to look like you bought it at a store, take the ties and neck band, turned right side out and all pretty, and sew all around the edges. This might seem like a pain, but it makes it look less homemade and more professional.
It should look like this. One of the edges below is raw, just to show you some will look like that. It's cool, we'll cover it up later.
For the ruffle, sew the three pieces into one humungous strip. Do this by matching up the short sides, put right sides together, sew at 3/8 of an inch. Do the same with the next. 135 inches by 6 inches should be your final approximate measurement.
Hem along one edge, folding over twice so no raw edges of the fabric are showing. If you fly by the seat of your pants, fold it over as you sew. If that makes you nervous, fold over twice, iron, pin, then sew.
It should look a lot like this:
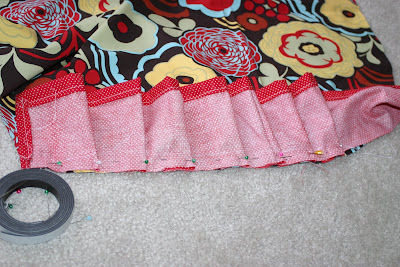
Now pin it around your main fabric. I pleated it, mainly because doing a gather on stiffer cotton is a pain to me. But if that's how you roll, go for it. I just folded over an inch under every few inches. Look at the pic below, it will make sense.
Then I did that all the way around. At the top of each side, at the waist, pin the raw edge of your ties in between the ruffle and main apron. Like the picture below. Sew it all the way around. Take your time, it totally stinks to have to rip out seams of ruffles. Just saying.
You can sew on your pockets now too, just sew around the sides and bottom. I didn't add them to Holly's, so look at the pic above for placement clues.


After you've done all that, iron the seam into the middle part of the apron. Serge it if you have that option. If not, it'll be ok.
Then sew the seam flat, all the way around. See how there's two rows of seams on the inside seam, and from the oustide, looks like a seam where the ruffle attaches, and another seam right below it?
Closer up.
Next add the edging to the neckline, like the edging of a quilt. This is kind of tedious. And I forgot to take a picture. Sorry!
- Fold your edging fabric in half, and iron.
- Unfold.
- Then fold over the edges to the middle, and iron.
- Now unfold the main fold, and pin it all around the top of the apron. It's kind of tricky at the corners, to fold it over so it's got neat diagonals. But you can do it. Play with it a little bit. After you have it pinned, sew. It should look like this:
If you're really struggling with it, check out this tutorial, Quilt Binding, that's way better than mine, courtesy of Heather Bailey, quilt fabric designer for Free Spirit.
Next up is the neck tie. Sew it onto the top of the apron, folding under the raw edges. Sew over it a few times back and forth for strength, or make an X for extra Hefty strength.


No comments:
Post a Comment